Introduction
Welcome to STACKIT Functions – STACKIT’s premier serverless functions-as-a-service offering!
Why Functions? Serverless functions offer the following benefits for your project:
- Scalable - Automatically scales up or down based on the number of incoming requests, ensuring efficient resource utilization, incl. scale-to-zero.
- Cost Efficient - You only pay for the compute time you use and don’t pay for idle. This can lead to significant cost savings compared to traditional server-based models.
- Serverless - The cloud provider manages the servers, allowing developers to focus solely on writing code. The cloud provider handles maintenance, updates, and security patches.
- Event Driven - Ideal for applications that need to respond to events in real-time, such as IoT devices or webhooks. Useful for data processing, real-time analytics, microservice architectures.
- Language Agnostic - Supports multiple programming languages, making it easy to develop and deploy functions in the language of your choice.
- Rapid Deployment - Enables user to iterate quickly. Great fit for Startups, R&D departements and every use case where results have to be delivered fast.
This documentation will help you create, develop, and deploy your first STACKIT Function using the STACKIT Functions CLI (sfn).
STACKIT Functions Concepts
With STACKIT Functions, you can package and deploy your code as containers, which are automatically scaled in response to incomming HTTP requests.
STACKIT Functions requires a container registry to store container images in. You can bring your own container registry, or, if you don’t have one yet, you can use the STACKIT Container Registry.
STACKIT Functions resources
Within STACKIT Functions, there are three main “resources” you can interact with:
-
A “Function” is the interface for your code. It mainly consists of an unique URL to which it’s deployed, and serves as the “identity” of your code, when communicating with external services.
-
A “Revision” is the implementation of your code. It holds all the configuration related to executing your code, such as what OCI image and environment variables to use. A Function has only one current revision deployed, while the rest of the revisions serve as version history of your application.
-
A “Registry” holds the credentials used for pulling container images. You can share a registry configuration between multiple revisions.
STACKIT Functions CLI
The STACKIT Functions CLI (sfn) is the main way in which you interact with STACKIT Functions.
The CLI works with manifests files, function.yaml and revision.yaml, which hold together all the information needed to create a new function and to build and deploy an function image as a new revision.
You can bootstrap new functions using the official STACKIT Functions templates. This is done using the sfn function create command.
You can build runnable container images from those templates, using the STACKIT Functions builder. This is done using the sfn function build command or the --build flag.
You can then push the image to your container registry and deploy the function to the STACKIT Functions runtime, using the STACKIT Functions CLI. This is done using the sfn function deploy command.
STACKIT Functions runtime
The STACKIT Functions runtime is built on top of Knative, a CNCF project for running serverless functions on top of Kubernetes.
When you deploy a function to STACKIT Functions, our runtime takes care of creating the relevant Knative configurations and making your function accessible at a public URL.
Plans and concurrency
When you deploy a function to STACKIT, STACKIT Functions takes care of launching instances of your function in response to incoming requests.
STACKIT Functions offers a lot of flexibility in for configuring the scaling and resource usage of your functions.
Available configuration options
Plan
Your function’s plan determines the memory available to individual instances of your function.
For example, if you use the plan with 128 MB of RAM, then when a request comes, the STACKIT Functions Runtime would allocate 128 MB to running an instance of your function. Further requests will be processed by the same instance, unless the STACKIT Functions Runtime determines it needs to launch a second instance (as described in the Concurrency section), or the STACKIT Functions Runtime scales your function back to zero instances after sufficient time has pass without requests.
All plans come equipped with 1 shared vCPU core. Please contact us if you want to deploy functions that require multiple vCPU cores per instance or dedicated vCPU cores.
Concurrency
Your function’s concurrency determines the maximum number of in-flight requests it can process at the same time.
An in-flight request is a request that the function has not fully responded to yet.
Note that concurrency is not the number of requests per second an instance of your function can process.
For example, if your function takes 0.2s to process every request, then to handle 10 requests per second, it only needs to process 2 in-flight requests at the same time.
More generally, request rate = concurrency / time per request.
Concurrency should be set so that your function is able to process at least that many requests at the same time within the memory limit set by the plan.
Maximum scale
(Not yet available) Your function’s maximum scale determines the maximum number of instances it can have running at the same time within the STACKIT Functions platform.
You can use this to control the maximum spending of a function deployment.
Selecting correct scaling parameters
The main factor when selecting a plan and concurrency for your function is the memory used by that function.
Ideally, you can run your function locally, and measure its resource usage.
You care about two values:
- The memory usage of your function “at rest”, when no requests are coming in.
- The peak memory usage of your function per request, that is, the overhead associated with processing each request.
Then, you can select any plan which is larger than your function’s at-rest usage. Ideally, you would like the plan to be at least twice as large as the at-rest memory use, unless your function is seldom used, and you expect only a few concurrent requests.
For example, if your function takes 200MB of RAM at rest, you want to pick a plan with at least 400MB of memory.
From there, you can calculate a concurrency value by dividing the left over space in your plan by the per-request usage.
For example, if you use a 512MB plan for the function describe above, you would have 512 MB - 200 MB = 312 MB left over. If that function takes a maximum of 6MB to process a request, you can set concurrency to 312 MB / 6 MB = 52.
Installing the STACKIT Function CLI
The STACKIT Functions CLI (sfn) is available from the stackitcloud/sfn-cli GitHub Repository.
From there, you can download the latest release as a .tar.gz (Unix systems) or .zip (Windows) file, which includes the sfn (or sfn.exe) binary. Extract that somewhere in your $PATH, and you are good to go!
To automate the process, we have developed an installation script that you can download and run on Linux and Mac:
curl -o ./install-sfn.sh https://raw.githubusercontent.com/stackitcloud/sfn-cli/refs/heads/main/install-sfn.sh

chmod u+x ./install-sfn.sh
./install-sfn.sh
What is in the installation script?
We invite you to preview the contents of the install script. It is written as readable Bash with minimal indirection, to allow you to audit it and potentially customize it to your needs:
#!/bin/sh
set -e

# Check prerequisites:
which curl >/dev/null || (echo "ERROR: curl not found; this script requires curl to run"; exit 1)

# Defaults:
DRY_RUN="${DRY_RUN:-}"
INSTALL_DIR="${INSTALL_DIR:-$HOME/.local/bin}"
INSTALL_VERSION="${INSTALL_VERSION:-latest}"
INSTALL_GOOS="${INSTALL_GOOS:-autodetect}"
INSTALL_GOARCH="${INSTALL_GOARCH:-autodetect}"

# Parse arguments: # https://stackoverflow.com/a/14203146
while [ $# -gt 0 ]; do
    case "$1" in
        --help)
            echo "Usage: $0 [--path \$HOME/.local/bin] [--version latest] [--os autodetect] [--arch autodetect] [--dry-run]"
            echo "Install the latest STACKIT Function CLI binary from GitHub releases"
            exit 1
        ;;
        --path)    INSTALL_DIR="$2"; shift ;;
        --version) INSTALL_VERSION="$2"; shift;;
        --os)      INSTALL_GOOS="$2"; shift;;
        --arch)    INSTALL_GOARCH="$2"; shift;;
        --dry-run) DRY_RUN='1';;
        --*) echo "ERROR: Unknown option $1" && exit 2;;
    esac
    shift || (echo "ERROR: Expected argument"; exit 2)
done

# Resolve OS and architecture:
if [ "$INSTALL_GOOS" = 'autodetect' ]; then
    case "$(uname -s)" in
        darwin | Darwin) INSTALL_GOOS="darwin";;
        linux | Linux) INSTALL_GOOS="linux";;
        *) echo "ERROR: Unknown operating system: $(uname -s)" && exit 3;;
    esac
fi
if [ "$INSTALL_GOARCH" = 'autodetect' ]; then
    case "$(uname -m)" in
        x86_64 | amd64) INSTALL_GOARCH="amd64";;
        aarch64 | arm64) INSTALL_GOARCH="arm64";;
        *) echo "ERROR: Unknown architecture: $(uname -m)" && exit 3;;
    esac
fi

# Resolve latest version:
if [ "$INSTALL_VERSION" = 'latest' ]; then
    INSTALL_VERSION="$(curl --silent https://api.github.com/repos/stackitcloud/sfn-cli/releases/latest | sed -En 's|.+"tag_name": "v([^"]+)".+|\1|p')"
fi

# Construct download URL:
DOWNLOAD_URL="https://github.com/stackitcloud/sfn-cli/releases/download/v${INSTALL_VERSION}/sfn_${INSTALL_VERSION}_${INSTALL_GOOS}_${INSTALL_GOARCH}.tar.gz"

# Download and install:
echo "INFO: Downloading SFN CLI $INSTALL_VERSION from $DOWNLOAD_URL and installing to $INSTALL_DIR"
if [ -z "$DRY_RUN" ]; then
    mkdir -p "$INSTALL_DIR"
    curl -L "$DOWNLOAD_URL" | tar -xz -C "$INSTALL_DIR" sfn
    echo "INFO: Installed SFN CLI to $INSTALL_DIR/sfn!"
else
    echo "INFO: Dry run, skipping installation"
fi

# Check whether PATH contains install dir: # https://unix.stackexchange.com/a/32054
case ":$PATH:" in
*:$INSTALL_DIR:*);;
*)
echo "WARNING: $INSTALL_DIR is not part of your \$PATH"
echo "To use the \`sfn\` command, add export PATH=\"$INSTALL_DIR:\$PATH\" to your ~/.bashrc or ~/.zshrc (or use fish_add_path $INSTALL_DIR)."
echo "Alternatively, call the sfn CLI directly using \`$INSTALL_DIR/sfn\`"
;;
esac
Then, as long as $HOME/.local/bin is in your $PATH, you should be able to run sfn:
$ sfn --version
sfn 1.3.0
Configure access
You need to configure access to the STACKIT project, before you can start using STACKIT Functions. In particular, you need to configure:
- Permissions for your STACKIT account to be able to access STACKIT Functions.
- Registry secrets for STACKIT Functions to be able to access your OCI container image.
Needed permissions
For your user account to be able to deploy functions in a STACKIT project, it needs to have the relevant functions.* permissions, included with the “owner”, “editor”, and “Functions Admin” roles:

You can assign one of these roles using the IAM and management portal, as described in Assign roles to a user or service account.
Logging in
To authorize the STACKIT CLI, use the sfn auth login command:
sfn auth login --project-id <your project ID>
This should open a browser window in which you can give the sfn CLI access to your account.
In addition, the STACKIT CLI will enable the Functions service for your project.
For programmatic access, you can also use service account keys:
sfn auth login --project-id <your project ID> --service-account-key-path <path to service account key.json>
Note: you need to log in at least once with a user account, as the CLI will not attempt enabling the STACKIT Functions service from a service account.
Registry access
To be able to push and pull private function images, the STACKIT Functions CLI and runtime require access to a Docker/OCI registry. If you do not already have an OCI registry for your project, you can use the STACKIT Container Registry.
CLI
The STACKIT Functions CLI uses registry push secrets, that allow it to upload images to the OCI registry. By default, it reads these from your Docker configuration at ~/.docker/config.json.
When using the STACKIT Container Registry, you can follow the instructions at “Create your first Container Registry” in order to authenticate to the Container Registry using the Docker CLI. Other registries will have similar instructions in their documentation.
Runtime
The STACKIT Functions runtime needs registry pull secrets, that allow it to upload images to the OCI registry.
You can configure the registry pull secrets using the STACKIT Functions CLI:
sfn pull-secrets create --address <address>
The command is interactive. It will prompt you for your registry credentials:
Username: <enter username with pull access>
Password: <enter password>
This command will create a new registry credentials configuration in your project, which you can later use when deploying functions.
NOTE: When executing the command, the program will try to access the registry with the provided credentials before submitting. You can disable this check with the –no-validate flag
sfn pull-secrets create --address <address> --no-validate
When using the STACKIT Container Registry, we recommend that you can create a Robot Account for STACKIT Functions access, instead of reusing your personal account, by following these steps:
- Navigate to your project within the Container Registry.
- Go to the Robot Accounts overview page by clicking on the Robot Accounts Tab.
- Click New Robot Account.
- Configure the Basic information for the Robot Account. Name can be any descriptive name, perhaps “stackit-functions”; if you configure an expiration time, do note that your functions may stop working after the expiration time has passed.
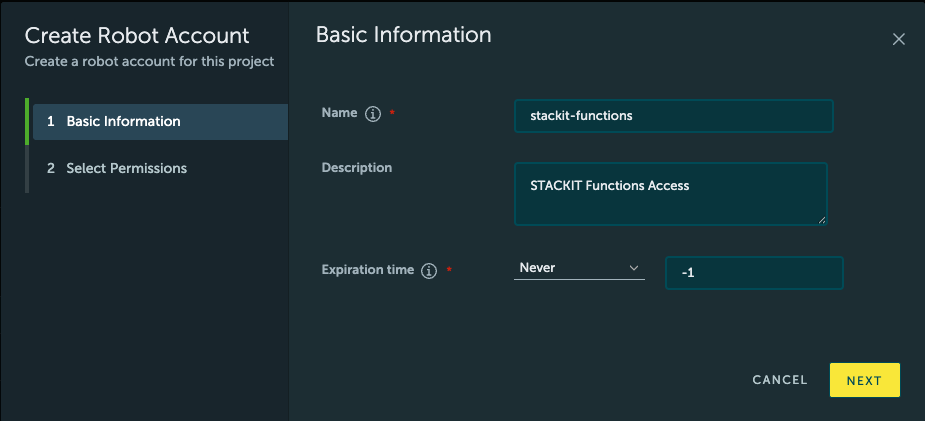
- For Permissions, configure only the “Registry” “Pull” permission, as seen in the screenshot.
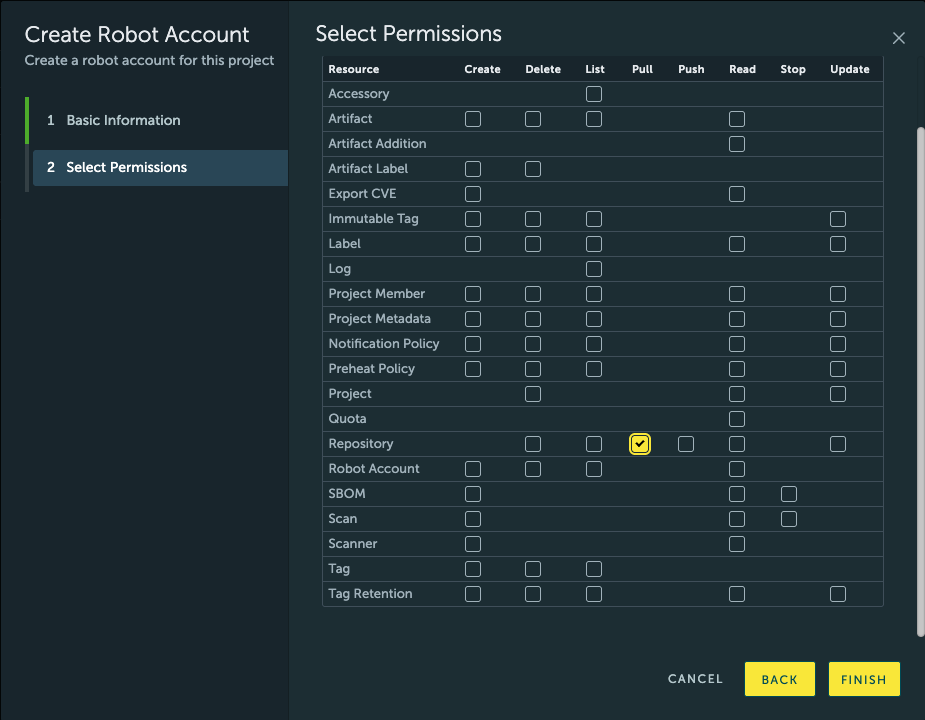
- In the final screen, copy the generated username and password (note that you won’t be able to access the password again if you close the screen), and use the following command to configure a new registry:
sfn config registry add registry.onstackit.cloud
Username: robot$...
Password: ***
With this, you are all set up to use a private image registry with your STACKIT Functions project.
Create functions
Initializing a function from template
To create a new function, you can use the sfn function bootstrap command. This will pull in the STACKIT Functions templates, and initialize one of them in a folder of your choice.
sfn function bootstrap
The command will lead you through a wizard, configuring a name for the function, path to the folder containing generated source code, the runtime, flavor and language of your function.
In the end, this command will initialize a new project at {path}/{name}/ with a .stackit-functions subfolder inside. The folder contains resource based yaml manifests for function and revision.
Developing functions
You can learn more about the code which the templates generate in the Generated code reference.
See the next section, Build and run functions locally to learn more about debug your functions’ code before deploying.
Build and run functions locally
The STACKIT Function CLI contains commands that simplify the process of building and running a function locally.
Building STACKIT Functions images is handled using Cloud Native Buildpacks, a CNCF project for automatically detecting source code requirements and building images, without requiring complicated configuration.
Note: both building and running functions, require a running Docker installation, accessible over a Unix domain socket in $DOCKER_HOST (or over the default /var/run/docker.sock socket). Full support for alternative OCI runtimes, especially Podman, will come in later releases.
Build a function
To build a function, run the following command in the project directory created by sfn function bootstrap:
cd <path-to-functions-project>
sfn function build
When running the build command for the first time, it will error out because you don’t have an image name configured yet. Configure one with the --image flag:
sfn function build --image <your OCI registry>/<repository>/<image name>:<tag>
Finally, to see the messages printed by the build process, pass the --verbose flag to the sfn function build command:
sfn function build --verbose
Run a function locally
Once you have built a function, you can run it with the run subcommand:
sfn function run
This will start a Docker container with your function, in a simulation of the STACKIT functions environment.
You can access the running function at http://127.0.0.1:8080 by default, unless you override the port the CLI binds to with the --address flag.
Meanwhile, the sfn CLI will forward the log messages from your locally-running function, which you can use for debugging purposes.
Defining local memory limits
To mimic the deployment you can limit the memory configuration when testing functions on your local machine.
The only thing you have to do is to define the annotation cli.functions.stackit.cloud/local-memory-limit-mb in your revision.yaml manifest file, and then to run your function locally, e.g.:
cli.functions.stackit.cloud/local-memory-limit-mb: '100'
The unit of the memory parameter is MegaBytes
Deploy functions
After you have build and tested your function, it’s time to deploy it to STACKIT Functions for real.
To do so, you can follow these steps:
- Get the ID of the Registry credential you want the STACKIT Functions to use, using the STACKIT Functions CLI:
This command will print out a list of registry credentials configured in your project; pick the one matching the image you want to deploy.sfn pull-secrets list - Invoke the
pushsubcommand to upload the image to the OCI registry:
(Note:sfn function pushpushwill pick the right registry from the--imageflag you passed tosfn function buildearlier. If you need to override the image for the deployment process, you can also pass the--imageflag to thedeployandpushsubcommands) - Invoke the
deploysubcommand to create the STACKIT Functions configuration:
(Note:sfn function deploydeployalso has options for building and pushing as part of the same step. See thesfn function deployreference for more details.)
Once the deployment process completes, you should get a message similar to the following:
Name: your-function-name
ID: 00000000-0000-0000-0000-000000000000
Created: 1234-05-06T07:08:09.101112Z
Updated: 1234-05-06T07:08:09.101112Z
URL: 00000000-0000-0000-0000-000000000000.functions.onstackit.cloud
Follow the URL displayed by the command to see your function running on the STACKIT Functions runtime!
Note: It might take about a minute for your newly-deployed function revision to become available.
Note: Check out the Troubleshooting guide if your function is not available even after a minute has passed.
Read function logs
After you have deployed your function to STACKIT Functions, you can use the sfn functions logs command to view its log output.
This command allows you to retrieve and browse log output for a deployed function.
Usage
sfn functions logs [OPTIONS]
Options
| Flag | Type | Default | Description |
|---|---|---|---|
--page-size | integer | 20 | Number of log lines to display per page (max: 100). |
--stream | string | — | Filter by output stream: stdout or stderr. |
--from | string (ISO 8601) | — | Show only logs at or after this timestamp. |
--to | string (ISO 8601) | — | Show only logs at or before this timestamp. |
--project-id | string (uuid) | — | STACKIT project ID. Falls back to the workspace manifest. |
--function-id | string (uuid) | — | Function ID. Falls back to the workspace manifest. |
--path | path | current directory | Path to the workspace manifest file. |
Output Format
Each log line is printed as:
<timestamp> [<stream>] <message>
Example:
2026-04-18T10:00:00Z [stdout]	Function invoked successfully
2026-04-18T10:00:01Z [stdout]	Processing request took 42ms
2026-04-18T10:00:06Z [stderr]	Unhandled exception: NullPointerException
Paging
Logs are fetched one page at a time. After each page you will be prompted:
-- Page 1 shown. Press [Enter] for next page, [q] to quit --
- Press Enter to fetch and display the next page.
- Press q then Enter to exit immediately.
Pagination stops automatically when there are no more logs to retrieve.
Examples
Show the first page of logs (default page size: 20)
sfn functions logs
Show 50 log lines per page
sfn functions logs --page-size 50
Show only stderr logs
sfn functions logs --stream stderr
Show logs from a specific time onwards
sfn functions logs --from 2026-04-18T10:00:00Z
Show logs within a time range
sfn functions logs --from 2026-04-18T10:00:00Z --to 2026-04-18T11:00:00Z
Combine stream filter with a time range
sfn functions logs --stream stderr --from 2026-04-18T10:00:00Z --to 2026-04-18T11:00:00Z
Use an explicit function and project ID
sfn functions logs \
  --project-id a1b2c3d4-0000-0000-0000-000000000001 \
  --function-id f1e2d3c4-0000-0000-0000-000000000002
Point to a manifest file in a different directory
sfn functions logs --path /path/to/my-function
Notes
-
Timestamps must be in ISO 8601 format, e.g.
2026-04-18T10:00:00Z. -
The
--fromand--toflags correspond to thestart_timeandend_timefilter fields in the underlying API. -
Piping output works as expected — the pager prompt is written to
stderr, sostdoutremains clean:sfn functions logs --stream stderr | grep "NullPointer"
Configure variables and secrets
In STACKIT Functions you can configure environment variables for your function so that you can e.g. control the log verbosity of your function or submit some API URL.
Variables are always bound to a function revision and not to the function itself so that they can be added/updated/removed upon deploying new revisions. There are multiple supported ways on how you can submit variables to our backend when creating a function revision.
Prompt
By default if no value is provided the CLI is interactively asking you to provide a value for a variable.
If you additionally use the --no-interactive flag, prompting will not work.
Fixed
If you do not need separate files for variables or have a non-sensitive variable which can be hardcoded you can also submit it as a fixed environment variable. Therefore you just assign a string value to the variable key in the revision.yaml:
MYVAR: "VALUE"
Env
You can declare an environment variable to be read in from the environment:
export MY_VARIABLE=DATA
And then in the revision.yaml manifest file:
    MYVAR:
      env: MY_VARIABLE
Dotenv
You can provide environment variables via dotenv by declaring the local filesystems path to the file and the environment variable key, e.g. to my_secret_file in the workspace root:
MY_VARIABLE=DATA
And then in the revision.yaml manifest file:
    MYVAR:
      file: my_secret_file
      env: MY_VARIABLE
File
Another way of declaring a variable is by specifying a path to a file which exclusively contains the variables value, e.g. file_data in workspace root:
DATA
And then in the revision.yaml manifest file:
    MYVAR:
      file: file_data
Secret
In the near future we will also support references to a STACKIT Secrets Manager instance so that you can bring your own instance and safely store sensitive information there. This feature is work in progress!
Automate function deployments
Automated deployments are required by programming practices like continuous deployment. This page describes the necessary requirements for integrating STACKIT Functions into your Continuous Deployment pipeline.
Authorize the pipeline
- Create a service account for your deployment pipeline. Give it a descriptive name, such as “functions-deployment-pipeline”
- Assign the “Functions Admin” role to the newly-created service account so it can access the Functions API.
- Create a service account key. Copy it in JSON format.
- Add the service account key to your pipeline as a secret. The exact location for configuring pipeline secrets will differ depending on your Continuous Integration / Continunous Deployment (CI/CD) pipeline provider. For example, in Forgejo (and thus STACKIT Git), you can find repository pipeline secrets under Repository > Settings > Actions > Secrets; in GitHub, secrets can be found in Repository > Settings > Secrets and Variables > Actions; and in Azure DevOps, secrets are specified in Pipelines > Library > Variable Groups or Pipelines > Pipeline > Edit > Variables
- Add registry credentials to your pipeline as a secret. You would need credentials for pushing images to the container registry of your choice; typically, the username and a password of an automated account. As mentioned above, the exact method for configuring pipeline secrets will differ depending on the pipeline provider you use.
Use the STACKIT Functions CLI in your pipeline
The way you configure your pipeline will depend on the exact Continuous Integration / Continunous Deployment (CI/CD) pipeline provider you use.
-
Install the Functions CLI as one of the steps of the pipeline.
With GitHub Actions or Forgejo Actions, you can add the following step inside of
jobs.*.steps:- name: Install the STACKIT Functions CLI run: | curl https://raw.githubusercontent.com/stackitcloud/sfn-cli/refs/heads/main/install-sfn.sh | bash -
Use the
sfn auth logincommand with the service account key, in a later step.With GitHub Actions or Forgejo Actions, you can add the following step inside of
jobs.*.steps:- name: Log in to STACKIT Functions env: PROJECT_ID: "<your project ID here>" run: | $HOME/.local/bin/sfn auth login --service-account=${{ secrets.SERVICE_ACCOUNT }} -
With GitHub Actions or Forgejo Actions, you can add the following step inside of
jobs.*.steps:- name: Deploy to STACKIT Functions env: # Used by the sfn CLI as registry credentials: FUNC_USERNAME: ${{ secrets.REGISTRY_USERNAME }} FUNC_PASSWORD: ${{ secrets.REGISTRY_PASSWORD }} run: | $HOME/.local/bin/sfn function deploy
Create custom functions without using the provided templates
You can build your own function container images if the templates built into the STACKIT Functions CLI do not provide the languages/technologies you want to use.
Once you have a built container image with the technology of your choice, you can deploy the image using the sfn function deploy command.
Functions container interface
The KNative-based STACKIT Functions runtime expects a linux/amd64 container. Instead of that container, you should:
- Expose an HTTP 1.1-compatible server on the port defined in the
PORTenvironment variable. - Handle the SIGTERM signal to run any cleanup logic.
Build with Dockerfile
You can build containers using technologies other than Buildpacks, as long as the final built container follows the interface explained eariler in Functions container interface.
For example, using a Dockerfile and the STACKIT Container Registry:
docker build . -t <your-registry.domain/group/image> --platform linux/amd64
Then, you can deploy your function using the STACKIT Functions CLI, passing the --build=false and --push=true flags:
sfn function deploy \
    --build=false \
    --push=true \
    --image <your-registry.domain/group/image>
Using existing images
You can deploy existing images to STACKIT Functions if those images match the required functions container interface. For example, images created by the Knative func CLI are compatible with STACKIT Functions, if they have a matching platform of linux/amd64.
To deploy an existing image already uploaded to a Docker/ICO repository with the STACKIT Functions CLI, pass the --push=false and --build=false flags to sfn function deploy:
sfn function deploy \
    --build=false \
    --push=false \
    --image <your-registry.domain/group/image>
This will deploy a function on STACKIT without building or uploading the image anew.
Create custom templates
You can create custom STACKIT Functions templates, by following the structure of the Official templates.
In particular, a templates repository should contain a separate folder for each template, containing a stackit-functions.yaml file. Repository layout:
https://git-host.example/user/repository-name.git
|-- template-folder
|   |-- stackit-functions.yaml
|   |-- README.md
|   `-- ... source code
`-- ... other templates
Starting from
v1.5.0the manifest file is automatically rewritten and splitted into multiple manifests. Thestackit-functions.yamlmanifest file should not be used anymore as configuration won’t be picked up by the CLI.
The runtime will be used by the STACKIT Function CLI to select the correct entrypoint, as described by the Generated code reference.
Installing custom templates
To install a custom templates repository, use the template install subcommand:
sfn template install --source https://git-host.example/user/repository-name.git
Then, the sfn function create will then be able to use your the custom templates for initializing new function projects.
CLI reference
Auth
Login to STACKIT Functions
Usage: sfn auth login [OPTIONS]

Options:
      --p-id <P_ID>
          Id of the project to use [env: FUNC_PROJECT_ID=] [aliases: --project-id]
      --project-name <PROJECT_NAME>
          Name of the project to use [env: FUNC_PROJECT_NAME=]
      --service-account-key-path <SERVICE_ACCOUNT_KEY_PATH>

      --private-key-path <PRIVATE_KEY_PATH>
          RSA private key path. Takes precedence over the key in the service account key, if present
      --service-account-key <SERVICE_ACCOUNT_KEY>

  -h, --help
          Print help
  -V, --version
          Print version
      --no-interactive
          Skip interactive confirmation [env: FUNC_NO_INTERACTIVE=]
      --no-progress
          Hide all progress bars [env: FUNC_NO_PROGRESS=]
  -o, --output <OUTPUT>
          [env: FUNC_OUTPUT=] [default: table] [possible values: json, yaml, table, silent]
  -v, --verbose
          Verbose output [env: FUNC_VERBOSE=]
Logout from STACKIT Functions
Usage: sfn auth logout [OPTIONS]

Options:
  -h, --help             Print help
  -V, --version          Print version
      --no-interactive   Skip interactive confirmation [env: FUNC_NO_INTERACTIVE=]
      --no-progress      Hide all progress bars [env: FUNC_NO_PROGRESS=]
  -o, --output <OUTPUT>  [env: FUNC_OUTPUT=] [default: table] [possible values: json, yaml, table, silent]
  -v, --verbose          Verbose output [env: FUNC_VERBOSE=]
Config
View configuration
Usage: sfn config describe [OPTIONS]

Options:
  -h, --help             Print help
  -V, --version          Print version
      --no-interactive   Skip interactive confirmation [env: FUNC_NO_INTERACTIVE=]
      --no-progress      Hide all progress bars [env: FUNC_NO_PROGRESS=]
  -o, --output <OUTPUT>  [env: FUNC_OUTPUT=] [default: table] [possible values: json, yaml, table, silent]
  -v, --verbose          Verbose output [env: FUNC_VERBOSE=]
Update configuration
Usage: sfn config update [OPTIONS] <KEY> <VALUE>

Arguments:
  <KEY>    The configuration key [possible values: project-id]
  <VALUE>  The new value of configs key

Options:
  -h, --help             Print help
  -V, --version          Print version
      --no-interactive   Skip interactive confirmation [env: FUNC_NO_INTERACTIVE=]
      --no-progress      Hide all progress bars [env: FUNC_NO_PROGRESS=]
  -o, --output <OUTPUT>  [env: FUNC_OUTPUT=] [default: table] [possible values: json, yaml, table, silent]
  -v, --verbose          Verbose output [env: FUNC_VERBOSE=]
Config Pull-Secret
Add a pull-secret for a registry
Usage: sfn pull-secrets create [OPTIONS]

Options:
  -p, --path <PATH>
          Path to the function workspace. Default is current directory ($FUNC_PATH) [env: FUNC_PATH=]
      --p-id <P_ID>
          Id of the project to use [env: FUNC_PROJECT_ID=] [aliases: --project-id]
      --project-name <PROJECT_NAME>
          Name of the project to use [env: FUNC_PROJECT_NAME=]
      --address <ADDRESS>
          The remote registry address
      --label <LABEL>
          The pull secret labels metadata
      --pull-secret-name <PULL_SECRET_NAME>
          A name to identify the pull secrets by
      --no-validate
          Skip registry credentials validation
  -h, --help
          Print help
  -V, --version
          Print version
      --no-interactive
          Skip interactive confirmation [env: FUNC_NO_INTERACTIVE=]
      --no-progress
          Hide all progress bars [env: FUNC_NO_PROGRESS=]
  -o, --output <OUTPUT>
          [env: FUNC_OUTPUT=] [default: table] [possible values: json, yaml, table, silent]
  -v, --verbose
          Verbose output [env: FUNC_VERBOSE=]
Get a single registry pull secret
Usage: sfn pull-secrets describe [OPTIONS]

Options:
  -p, --path <PATH>
          Path to the function workspace. Default is current directory ($FUNC_PATH) [env: FUNC_PATH=]
      --p-id <P_ID>
          Id of the project to use [env: FUNC_PROJECT_ID=] [aliases: --project-id]
      --project-name <PROJECT_NAME>
          Name of the project to use [env: FUNC_PROJECT_NAME=]
      --ps-id <PS_ID>
          Id of the pll secret to use [env: FUNC_PULL_SECRET_ID=] [aliases: --id, --pull-secret-id]
      --pull-secret-name <PULL_SECRET_NAME>
          Name of the pull secret to use [env: FUNC_PULL_SECRET_NAME=] [aliases: --name]
  -h, --help
          Print help
  -V, --version
          Print version
      --no-interactive
          Skip interactive confirmation [env: FUNC_NO_INTERACTIVE=]
      --no-progress
          Hide all progress bars [env: FUNC_NO_PROGRESS=]
  -o, --output <OUTPUT>
          [env: FUNC_OUTPUT=] [default: table] [possible values: json, yaml, table, silent]
  -v, --verbose
          Verbose output [env: FUNC_VERBOSE=]
List registries
Usage: sfn pull-secrets list [OPTIONS]

Options:
  -p, --path <PATH>
          Path to the function workspace. Default is current directory ($FUNC_PATH) [env: FUNC_PATH=]
      --p-id <P_ID>
          Id of the project to use [env: FUNC_PROJECT_ID=] [aliases: --project-id]
      --project-name <PROJECT_NAME>
          Name of the project to use [env: FUNC_PROJECT_NAME=]
      --ps-id <PS_ID>
          Id of the pll secret to use [env: FUNC_PULL_SECRET_ID=] [aliases: --id, --pull-secret-id]
      --pull-secret-name <PULL_SECRET_NAME>
          Name of the pull secret to use [env: FUNC_PULL_SECRET_NAME=] [aliases: --name]
  -h, --help
          Print help
  -V, --version
          Print version
      --no-interactive
          Skip interactive confirmation [env: FUNC_NO_INTERACTIVE=]
      --no-progress
          Hide all progress bars [env: FUNC_NO_PROGRESS=]
  -o, --output <OUTPUT>
          [env: FUNC_OUTPUT=] [default: table] [possible values: json, yaml, table, silent]
  -v, --verbose
          Verbose output [env: FUNC_VERBOSE=]
Update a registry
Usage: sfn pull-secrets update [OPTIONS]

Options:
  -p, --path <PATH>
          Path to the function workspace. Default is current directory ($FUNC_PATH) [env: FUNC_PATH=]
      --p-id <P_ID>
          Id of the project to use [env: FUNC_PROJECT_ID=] [aliases: --project-id]
      --project-name <PROJECT_NAME>
          Name of the project to use [env: FUNC_PROJECT_NAME=]
      --ps-id <PS_ID>
          Id of the pll secret to use [env: FUNC_PULL_SECRET_ID=] [aliases: --id, --pull-secret-id]
      --pull-secret-name <PULL_SECRET_NAME>
          Name of the pull secret to use [env: FUNC_PULL_SECRET_NAME=] [aliases: --name]
      --rename <RENAME>
          New name to set for the pull secret
      --label <LABEL>
          The pull secret labels metadata
      --address <ADDRESS>
          The remote registry address
      --no-validate
          Skip registry credentials validation
  -h, --help
          Print help
  -V, --version
          Print version
      --no-interactive
          Skip interactive confirmation [env: FUNC_NO_INTERACTIVE=]
      --no-progress
          Hide all progress bars [env: FUNC_NO_PROGRESS=]
  -o, --output <OUTPUT>
          [env: FUNC_OUTPUT=] [default: table] [possible values: json, yaml, table, silent]
  -v, --verbose
          Verbose output [env: FUNC_VERBOSE=]
Delete a registry
Usage: sfn pull-secrets delete [OPTIONS]

Options:
  -p, --path <PATH>
          Path to the function workspace. Default is current directory ($FUNC_PATH) [env: FUNC_PATH=]
      --p-id <P_ID>
          Id of the project to use [env: FUNC_PROJECT_ID=] [aliases: --project-id]
      --project-name <PROJECT_NAME>
          Name of the project to use [env: FUNC_PROJECT_NAME=]
      --ps-id <PS_ID>
          Id of the pll secret to use [env: FUNC_PULL_SECRET_ID=] [aliases: --id, --pull-secret-id]
      --pull-secret-name <PULL_SECRET_NAME>
          Name of the pull secret to use [env: FUNC_PULL_SECRET_NAME=] [aliases: --name]
  -h, --help
          Print help
  -V, --version
          Print version
      --no-interactive
          Skip interactive confirmation [env: FUNC_NO_INTERACTIVE=]
      --no-progress
          Hide all progress bars [env: FUNC_NO_PROGRESS=]
  -o, --output <OUTPUT>
          [env: FUNC_OUTPUT=] [default: table] [possible values: json, yaml, table, silent]
  -v, --verbose
          Verbose output [env: FUNC_VERBOSE=]
Environment
Get current environment
Usage: sfn environment describe [OPTIONS]

Options:
  -h, --help             Print help
  -V, --version          Print version
      --no-interactive   Skip interactive confirmation [env: FUNC_NO_INTERACTIVE=]
      --no-progress      Hide all progress bars [env: FUNC_NO_PROGRESS=]
  -o, --output <OUTPUT>  [env: FUNC_OUTPUT=] [default: table] [possible values: json, yaml, table, silent]
  -v, --verbose          Verbose output [env: FUNC_VERBOSE=]
Functions
Build a function
Usage: sfn functions build [OPTIONS]

Options:
  -p, --path <PATH>
          Path to the function workspace. Default is current directory ($FUNC_PATH) [env: FUNC_PATH=]
  -b, --build-env <BUILD_ENV>
          Build environment variables; specified as a comma-separated list of key=value pairs [env: FUNC_BUILD_ENV=] [default: ""]
      --build-timestamp <BUILD_TIMESTAMP>
          Build environment variables; specified as a comma-separated list of key=value pairs [env: FUNC_BUILD_TIMESTAMP=] [possible values: true, false]
      --builder-image <BUILDER_IMAGE>
          Specify a custom builder image for use by the builder other than its default. ($FUNC_BUILDER_IMAGE) [env: FUNC_BUILDER_IMAGE=]
  -i, --image <IMAGE>
          Full image name in the form [registry]/[namespace]/[name]:[tag] (optional). ($FUNC_IMAGE) [env: FUNC_IMAGE=]
      --platform <PLATFORM>
          Optionally specify a target platform, for example "linux/amd64" or "linux/arm64" [env: FUNC_PLATFORM=]
      --cache <CACHE>
          Specify a caching strategy (default: use volumes) [env: FUNC_CACHE=] [default: volume] [possible values: off, clean, volume]
      --username <USERNAME>
          Username used to authenticate with remote registry (FUNC_USERNAME) [env: FUNC_USERNAME=]
      --password <PASSWORD>
          Password used to authenticate with remote registry (FUNC_PASSWORD) [env: FUNC_PASSWORD=]
      --token <TOKEN>
          Token used to authenticate with remote registry (FUNC_TOKEN) [env: FUNC_TOKEN=]
      --container-docker-socket <CONTAINER_DOCKER_SOCKET>
          Docker socket address to mount into the container [env: CONTAINER_DOCKER_SOCKET=] [default: /var/run/docker.sock]
      --push
          Attempt to push the function image to the configured registry after being successfully built [env: FUNC_PUSH=]
  -h, --help
          Print help (see more with '--help')
  -V, --version
          Print version
      --no-interactive
          Skip interactive confirmation [env: FUNC_NO_INTERACTIVE=]
      --no-progress
          Hide all progress bars [env: FUNC_NO_PROGRESS=]
  -o, --output <OUTPUT>
          [env: FUNC_OUTPUT=] [default: table] [possible values: json, yaml, table, silent]
  -v, --verbose
          Verbose output [env: FUNC_VERBOSE=]
Bootstrap a function
Usage: sfn functions bootstrap [OPTIONS]

Options:
      --name <NAME>                    Name of the function (which will also be the directory name) [env: FUNC_NAME=]
  -p, --path <PATH>                    Path to the function project directory ($FUNC_PATH) [env: FUNC_PATH=]
      --label <LABEL>                  Function labels metadata
  -r, --runtime <RUNTIME>              Filter templates by function language runtime [env: FUNC_RUNTIME=]
  -t, --trigger <TRIGGER>              Filter templates by function trigger ("http" or "cloudevent") [env: FUNC_TRIGGER=]
      --source <SOURCE>                Filter templates by repository installed name (e.g., 'sfn-templates') [env: FUNC_SOURCE=]
      --template-name <TEMPLATE_NAME>  The name of the template within the repository (e.g., 'go-template') [env: FUNC_TEMPLATE_NAME=]
      --p-id <P_ID>                    Id of the project to use [env: FUNC_PROJECT_ID=] [aliases: --project-id]
      --project-name <PROJECT_NAME>    Name of the project to use [env: FUNC_PROJECT_NAME=]
      --plan <PLAN>                    The performance plan [env: FUNC_PLAN=]
      --concurrency <CONCURRENCY>      The function concurrency [env: FUNC_CONCURRENCY=]
  -h, --help                           Print help
  -V, --version                        Print version
      --no-interactive                 Skip interactive confirmation [env: FUNC_NO_INTERACTIVE=]
      --no-progress                    Hide all progress bars [env: FUNC_NO_PROGRESS=]
  -o, --output <OUTPUT>                [env: FUNC_OUTPUT=] [default: table] [possible values: json, yaml, table, silent]
  -v, --verbose                        Verbose output [env: FUNC_VERBOSE=]
Create a function
Usage: sfn functions create [OPTIONS]

Options:
  -p, --path <PATH>                    Path to the function workspace. Default is current directory ($FUNC_PATH) [env: FUNC_PATH=]
      --p-id <P_ID>                    Id of the project to use [env: FUNC_PROJECT_ID=] [aliases: --project-id]
      --project-name <PROJECT_NAME>    Name of the project to use [env: FUNC_PROJECT_NAME=]
      --function-name <FUNCTION_NAME>  Name of the new function
      --label <LABEL>                  Labels metadata
  -h, --help                           Print help
  -V, --version                        Print version
      --no-interactive                 Skip interactive confirmation [env: FUNC_NO_INTERACTIVE=]
      --no-progress                    Hide all progress bars [env: FUNC_NO_PROGRESS=]
  -o, --output <OUTPUT>                [env: FUNC_OUTPUT=] [default: table] [possible values: json, yaml, table, silent]
  -v, --verbose                        Verbose output [env: FUNC_VERBOSE=]
Delete a function
Usage: sfn functions delete [OPTIONS]

Options:
  -p, --path <PATH>                    Path to the function workspace. Default is current directory ($FUNC_PATH) [env: FUNC_PATH=]
      --p-id <P_ID>                    Id of the project to use [env: FUNC_PROJECT_ID=] [aliases: --project-id]
      --project-name <PROJECT_NAME>    Name of the project to use [env: FUNC_PROJECT_NAME=]
      --f-id <F_ID>                    Id of the function to use [env: FUNC_ID=] [aliases: --id, --function-id]
      --function-name <FUNCTION_NAME>  Name of the function to use [env: FUNC_NAME=] [aliases: --name]
  -h, --help                           Print help
  -V, --version                        Print version
      --no-interactive                 Skip interactive confirmation [env: FUNC_NO_INTERACTIVE=]
      --no-progress                    Hide all progress bars [env: FUNC_NO_PROGRESS=]
  -o, --output <OUTPUT>                [env: FUNC_OUTPUT=] [default: table] [possible values: json, yaml, table, silent]
  -v, --verbose                        Verbose output [env: FUNC_VERBOSE=]
Deploy a function
Usage: sfn functions deploy [OPTIONS]

Options:
  -p, --path <PATH>
          Path to the function workspace. Default is current directory ($FUNC_PATH) [env: FUNC_PATH=]
      --p-id <P_ID>
          Id of the project to use [env: FUNC_PROJECT_ID=] [aliases: --project-id]
      --project-name <PROJECT_NAME>
          Name of the project to use [env: FUNC_PROJECT_NAME=]
      --f-id <F_ID>
          Id of the function to use [env: FUNC_ID=] [aliases: --id, --function-id]
      --function-name <FUNCTION_NAME>
          Name of the function to use [env: FUNC_NAME=] [aliases: --name]
      --function-label <FUNCTION_LABEL>
          Function labels metadata [aliases: --label]
      --revision-name <REVISION_NAME>
          The name of the revision to create [env: FUNC_REVISION_NAME=]
      --revision-label <REVISION_LABEL>
          Revision labels metadata
      --build
          Whether to rebuild the function (implies --push) [env: FUNC_BUILD=]
      --push
          Whether to push the function [env: FUNC_PUSH=]
  -b, --build-env <BUILD_ENV>
          Build environment variables; specified as a comma-separated list of key=value pairs [env: FUNC_BUILD_ENV=] [default: ""]
      --build-timestamp <BUILD_TIMESTAMP>
          Build environment variables; specified as a comma-separated list of key=value pairs [env: FUNC_BUILD_TIMESTAMP=] [possible values: true, false]
      --builder-image <BUILDER_IMAGE>
          Specify a custom builder image for use by the builder other than its default. ($FUNC_BUILDER_IMAGE) [env: FUNC_BUILDER_IMAGE=]
  -i, --image <IMAGE>
          Full image name in the form [registry]/[namespace]/[name]:[tag] (optional). ($FUNC_IMAGE) [env: FUNC_IMAGE=]
      --platform <PLATFORM>
          Optionally specify a target platform, for example "linux/amd64" or "linux/arm64" [env: FUNC_PLATFORM=]
      --cache <CACHE>
          Specify a caching strategy (default: use volumes) [env: FUNC_CACHE=] [default: volume] [possible values: off, clean, volume]
      --username <USERNAME>
          Username used to authenticate with remote registry (FUNC_USERNAME) [env: FUNC_USERNAME=]
      --password <PASSWORD>
          Password used to authenticate with remote registry (FUNC_PASSWORD) [env: FUNC_PASSWORD=]
      --token <TOKEN>
          Token used to authenticate with remote registry (FUNC_TOKEN) [env: FUNC_TOKEN=]
      --concurrency <CONCURRENCY>
          the default concurrency of the function [env: FUNC_CONCURRENCY=]
      --plan <PLAN>
          the performance class (plan) to use [env: FUNC_PLAN=]
      --env <ENV>
          environment variables
      --env-file <ENV_FILE>
          name of the environment variables file (must be present in workspace root directory) [env: FUNC_ENV_FILE=]
      --no-wait
          Don't wait for the function to be fully deployed [env: FUNC_NO_WAIT=]
      --container-docker-socket <CONTAINER_DOCKER_SOCKET>
          Docker socket address to mount into the container [env: CONTAINER_DOCKER_SOCKET=] [default: /var/run/docker.sock]
  -h, --help
          Print help (see more with '--help')
  -V, --version
          Print version
      --no-interactive
          Skip interactive confirmation [env: FUNC_NO_INTERACTIVE=]
      --no-progress
          Hide all progress bars [env: FUNC_NO_PROGRESS=]
  -o, --output <OUTPUT>
          [env: FUNC_OUTPUT=] [default: table] [possible values: json, yaml, table, silent]
  -v, --verbose
          Verbose output [env: FUNC_VERBOSE=]
Describe a function
Usage: sfn functions describe [OPTIONS]

Options:
  -p, --path <PATH>                    Path to the function workspace. Default is current directory ($FUNC_PATH) [env: FUNC_PATH=]
      --p-id <P_ID>                    Id of the project to use [env: FUNC_PROJECT_ID=] [aliases: --project-id]
      --project-name <PROJECT_NAME>    Name of the project to use [env: FUNC_PROJECT_NAME=]
      --f-id <F_ID>                    Id of the function to use [env: FUNC_ID=] [aliases: --id, --function-id]
      --function-name <FUNCTION_NAME>  Name of the function to use [env: FUNC_NAME=] [aliases: --name]
  -h, --help                           Print help
  -V, --version                        Print version
      --no-interactive                 Skip interactive confirmation [env: FUNC_NO_INTERACTIVE=]
      --no-progress                    Hide all progress bars [env: FUNC_NO_PROGRESS=]
  -o, --output <OUTPUT>                [env: FUNC_OUTPUT=] [default: table] [possible values: json, yaml, table, silent]
  -v, --verbose                        Verbose output [env: FUNC_VERBOSE=]
List functions in project
Usage: sfn functions list [OPTIONS]

Options:
      --p-id <P_ID>                    Id of the project to use [env: FUNC_PROJECT_ID=] [aliases: --project-id]
      --project-name <PROJECT_NAME>    Name of the project to use [env: FUNC_PROJECT_NAME=]
      --f-id <F_ID>                    Id of the function to use [env: FUNC_ID=] [aliases: --id, --function-id]
      --function-name <FUNCTION_NAME>  Name of the function to use [env: FUNC_NAME=] [aliases: --name]
  -h, --help                           Print help
  -V, --version                        Print version
      --no-interactive                 Skip interactive confirmation [env: FUNC_NO_INTERACTIVE=]
      --no-progress                    Hide all progress bars [env: FUNC_NO_PROGRESS=]
  -o, --output <OUTPUT>                [env: FUNC_OUTPUT=] [default: table] [possible values: json, yaml, table, silent]
  -v, --verbose                        Verbose output [env: FUNC_VERBOSE=]
List function logs
Usage: sfn functions logs [OPTIONS]

Options:
  -p, --path <PATH>                    Path to the function workspace. Default is current directory ($FUNC_PATH) [env: FUNC_PATH=]
      --p-id <P_ID>                    Id of the project to use [env: FUNC_PROJECT_ID=] [aliases: --project-id]
      --project-name <PROJECT_NAME>    Name of the project to use [env: FUNC_PROJECT_NAME=]
      --f-id <F_ID>                    Id of the function to use [env: FUNC_ID=] [aliases: --id, --function-id]
      --function-name <FUNCTION_NAME>  Name of the function to use [env: FUNC_NAME=] [aliases: --name]
      --max-lines <MAX_LINES>          maximum line count returned in the log list
      --tail <TAIL>                    Starting time of logs Number of most recent log lines to show (default: 20). Use -1 for all available logs [default: 50]
  -f, --follow                         Stream (follow) logs continuously, polling for new entries (like kubectl logs -f)
      --stream <STREAM>                Filter by output stream: stdout or stderr
      --start-time <from>              Filter logs from this timestamp onwards (ISO 8601, e.g. 2026-04-18T10:00:00Z)
      --end-time <to>                  Filter logs up to this timestamp (ISO 8601, e.g. 2026-04-18T11:00:00Z)
  -h, --help                           Print help
  -V, --version                        Print version
      --no-interactive                 Skip interactive confirmation [env: FUNC_NO_INTERACTIVE=]
      --no-progress                    Hide all progress bars [env: FUNC_NO_PROGRESS=]
  -o, --output <OUTPUT>                [env: FUNC_OUTPUT=] [default: table] [possible values: json, yaml, table, silent]
  -v, --verbose                        Verbose output [env: FUNC_VERBOSE=]
Push a function
Usage: sfn functions push [OPTIONS]

Options:
  -p, --path <PATH>
          Path to the function workspace. Default is current directory ($FUNC_PATH) [env: FUNC_PATH=]
  -b, --build-env <BUILD_ENV>
          Build environment variables; specified as a comma-separated list of key=value pairs [env: FUNC_BUILD_ENV=] [default: ""]
      --build-timestamp <BUILD_TIMESTAMP>
          Build environment variables; specified as a comma-separated list of key=value pairs [env: FUNC_BUILD_TIMESTAMP=] [possible values: true, false]
      --builder-image <BUILDER_IMAGE>
          Specify a custom builder image for use by the builder other than its default. ($FUNC_BUILDER_IMAGE) [env: FUNC_BUILDER_IMAGE=]
  -i, --image <IMAGE>
          Full image name in the form [registry]/[namespace]/[name]:[tag] (optional). ($FUNC_IMAGE) [env: FUNC_IMAGE=]
      --platform <PLATFORM>
          Optionally specify a target platform, for example "linux/amd64" or "linux/arm64" [env: FUNC_PLATFORM=]
      --cache <CACHE>
          Specify a caching strategy (default: use volumes) [env: FUNC_CACHE=] [default: volume] [possible values: off, clean, volume]
      --username <USERNAME>
          Username used to authenticate with remote registry (FUNC_USERNAME) [env: FUNC_USERNAME=]
      --password <PASSWORD>
          Password used to authenticate with remote registry (FUNC_PASSWORD) [env: FUNC_PASSWORD=]
      --token <TOKEN>
          Token used to authenticate with remote registry (FUNC_TOKEN) [env: FUNC_TOKEN=]
      --container-docker-socket <CONTAINER_DOCKER_SOCKET>
          Docker socket address to mount into the container [env: CONTAINER_DOCKER_SOCKET=] [default: /var/run/docker.sock]
      --build
          Attempt to push the function image to the configured registry after being successfully built [env: FUNC_PUSH=]
  -h, --help
          Print help (see more with '--help')
  -V, --version
          Print version
      --no-interactive
          Skip interactive confirmation [env: FUNC_NO_INTERACTIVE=]
      --no-progress
          Hide all progress bars [env: FUNC_NO_PROGRESS=]
  -o, --output <OUTPUT>
          [env: FUNC_OUTPUT=] [default: table] [possible values: json, yaml, table, silent]
  -v, --verbose
          Verbose output [env: FUNC_VERBOSE=]
Run a function locally
Usage: sfn functions run [OPTIONS]

Options:
  -p, --path <PATH>
          Path to the function workspace. Default is current directory ($FUNC_PATH) [env: FUNC_PATH=]
      --build
          Build the function before running. (default false) [env: FUNC_BUILD=]
  -b, --build-env <BUILD_ENV>
          Build environment variables; specified as a comma-separated list of key=value pairs [env: FUNC_BUILD_ENV=] [default: ""]
      --build-timestamp <BUILD_TIMESTAMP>
          Build environment variables; specified as a comma-separated list of key=value pairs [env: FUNC_BUILD_TIMESTAMP=] [possible values: true, false]
      --builder-image <BUILDER_IMAGE>
          Specify a custom builder image for use by the builder other than its default. ($FUNC_BUILDER_IMAGE) [env: FUNC_BUILDER_IMAGE=]
  -i, --image <IMAGE>
          Full image name in the form [registry]/[namespace]/[name]:[tag] (optional). ($FUNC_IMAGE) [env: FUNC_IMAGE=]
      --platform <PLATFORM>
          Optionally specify a target platform, for example "linux/amd64" or "linux/arm64" [env: FUNC_PLATFORM=]
      --cache <CACHE>
          Specify a caching strategy (default: use volumes) [env: FUNC_CACHE=] [default: volume] [possible values: off, clean, volume]
      --username <USERNAME>
          Username used to authenticate with remote registry (FUNC_USERNAME) [env: FUNC_USERNAME=]
      --password <PASSWORD>
          Password used to authenticate with remote registry (FUNC_PASSWORD) [env: FUNC_PASSWORD=]
      --token <TOKEN>
          Token used to authenticate with remote registry (FUNC_TOKEN) [env: FUNC_TOKEN=]
      --address <ADDRESS>
          Interface and port range on which to bind and listen. Default is 127.0.0.1:8080. ($FUNC_ADDRESS) [env: FUNC_ADDRESS=] [default: 127.0.0.1:8080..8090]
      --container-docker-socket <CONTAINER_DOCKER_SOCKET>
          Docker socket address to mount into the container [env: CONTAINER_DOCKER_SOCKET=] [default: /var/run/docker.sock]
  -h, --help
          Print help (see more with '--help')
  -V, --version
          Print version
      --no-interactive
          Skip interactive confirmation [env: FUNC_NO_INTERACTIVE=]
      --no-progress
          Hide all progress bars [env: FUNC_NO_PROGRESS=]
  -o, --output <OUTPUT>
          [env: FUNC_OUTPUT=] [default: table] [possible values: json, yaml, table, silent]
  -v, --verbose
          Verbose output [env: FUNC_VERBOSE=]
Update a function
Usage: sfn functions update [OPTIONS]

Options:
  -p, --path <PATH>                    Path to the function workspace. Default is current directory ($FUNC_PATH) [env: FUNC_PATH=]
      --p-id <P_ID>                    Id of the project to use [env: FUNC_PROJECT_ID=] [aliases: --project-id]
      --project-name <PROJECT_NAME>    Name of the project to use [env: FUNC_PROJECT_NAME=]
      --f-id <F_ID>                    Id of the function to use [env: FUNC_ID=] [aliases: --id, --function-id]
      --function-name <FUNCTION_NAME>  Name of the function to use [env: FUNC_NAME=] [aliases: --name]
      --rename <RENAME>                New name to set for the function
      --label <LABEL>                  Labels metadata
  -h, --help                           Print help
  -V, --version                        Print version
      --no-interactive                 Skip interactive confirmation [env: FUNC_NO_INTERACTIVE=]
      --no-progress                    Hide all progress bars [env: FUNC_NO_PROGRESS=]
  -o, --output <OUTPUT>                [env: FUNC_OUTPUT=] [default: table] [possible values: json, yaml, table, silent]
  -v, --verbose                        Verbose output [env: FUNC_VERBOSE=]
Get function usage
Usage: sfn functions usage [OPTIONS]

Options:
  -p, --path <PATH>                    Path to the function workspace. Default is current directory ($FUNC_PATH) [env: FUNC_PATH=]
      --p-id <P_ID>                    Id of the project to use [env: FUNC_PROJECT_ID=] [aliases: --project-id]
      --project-name <PROJECT_NAME>    Name of the project to use [env: FUNC_PROJECT_NAME=]
      --f-id <F_ID>                    Id of the function to use [env: FUNC_ID=] [aliases: --id, --function-id]
      --function-name <FUNCTION_NAME>  Name of the function to use [env: FUNC_NAME=] [aliases: --name]
  -t, --time-span <TIME_SPAN>          Duration of the observation window (e.g. 300s, 5m, 1h, 1d, 1w) [default: 1h]
  -h, --help                           Print help
  -V, --version                        Print version
      --no-interactive                 Skip interactive confirmation [env: FUNC_NO_INTERACTIVE=]
      --no-progress                    Hide all progress bars [env: FUNC_NO_PROGRESS=]
  -o, --output <OUTPUT>                [env: FUNC_OUTPUT=] [default: table] [possible values: json, yaml, table, silent]
  -v, --verbose                        Verbose output [env: FUNC_VERBOSE=]
Function Revision
Create a function revision
Usage: sfn functions revision create [OPTIONS]

Options:
  -p, --path <PATH>
          Path to the function workspace. Default is current directory ($FUNC_PATH) [env: FUNC_PATH=]
      --p-id <P_ID>
          Id of the project to use [env: FUNC_PROJECT_ID=] [aliases: --project-id]
      --project-name <PROJECT_NAME>
          Name of the project to use [env: FUNC_PROJECT_NAME=]
      --f-id <F_ID>
          Id of the function to use [env: FUNC_ID=] [aliases: --function-id]
      --function-name <FUNCTION_NAME>
          Name of the function to use [env: FUNC_NAME=]
      --revision-name <REVISION_NAME>
          The name of the revision [env: FUNC_REVISION_NAME=]
      --build
          Whether to rebuild the function (implies --push) [env: FUNC_BUILD=]
      --push
          Whether to push the function [env: FUNC_PUSH=]
  -b, --build-env <BUILD_ENV>
          Build environment variables; specified as a comma-separated list of key=value pairs [env: FUNC_BUILD_ENV=] [default: ""]
      --build-timestamp <BUILD_TIMESTAMP>
          Build environment variables; specified as a comma-separated list of key=value pairs [env: FUNC_BUILD_TIMESTAMP=] [possible values: true, false]
      --builder-image <BUILDER_IMAGE>
          Specify a custom builder image for use by the builder other than its default. ($FUNC_BUILDER_IMAGE) [env: FUNC_BUILDER_IMAGE=]
  -i, --image <IMAGE>
          Full image name in the form [registry]/[namespace]/[name]:[tag] (optional). ($FUNC_IMAGE) [env: FUNC_IMAGE=]
      --platform <PLATFORM>
          Optionally specify a target platform, for example "linux/amd64" or "linux/arm64" [env: FUNC_PLATFORM=]
      --cache <CACHE>
          Specify a caching strategy (default: use volumes) [env: FUNC_CACHE=] [default: volume] [possible values: off, clean, volume]
      --username <USERNAME>
          Username used to authenticate with remote registry (FUNC_USERNAME) [env: FUNC_USERNAME=]
      --password <PASSWORD>
          Password used to authenticate with remote registry (FUNC_PASSWORD) [env: FUNC_PASSWORD=]
      --token <TOKEN>
          Token used to authenticate with remote registry (FUNC_TOKEN) [env: FUNC_TOKEN=]
      --concurrency <CONCURRENCY>
          the default concurrency of the function [env: FUNC_CONCURRENCY=]
      --plan <PLAN>
          the performance class (plan) to use [env: FUNC_PLAN=]
      --env <ENV>
          environment variables
      --env-file <ENV_FILE>
          name of the environment variables file (must be present in workspace root directory) [env: FUNC_ENV_FILE=]
      --no-wait
          Don't wait for the function to be fully deployed [env: FUNC_NO_WAIT=]
      --label <LABEL>
          Revision labels metadata
      --container-docker-socket <CONTAINER_DOCKER_SOCKET>
          Docker socket address to mount into the container [env: CONTAINER_DOCKER_SOCKET=] [default: /var/run/docker.sock]
  -h, --help
          Print help (see more with '--help')
  -V, --version
          Print version
      --no-interactive
          Skip interactive confirmation [env: FUNC_NO_INTERACTIVE=]
      --no-progress
          Hide all progress bars [env: FUNC_NO_PROGRESS=]
  -o, --output <OUTPUT>
          [env: FUNC_OUTPUT=] [default: table] [possible values: json, yaml, table, silent]
  -v, --verbose
          Verbose output [env: FUNC_VERBOSE=]
Delete a function revision
Usage: sfn functions revision delete [OPTIONS]

Options:
  -p, --path <PATH>                    Path to the function workspace. Default is current directory ($FUNC_PATH) [env: FUNC_PATH=]
      --p-id <P_ID>                    Id of the project to use [env: FUNC_PROJECT_ID=] [aliases: --project-id]
      --project-name <PROJECT_NAME>    Name of the project to use [env: FUNC_PROJECT_NAME=]
      --f-id <F_ID>                    Id of the function to use [env: FUNC_ID=] [aliases: --function-id]
      --function-name <FUNCTION_NAME>  Name of the function to use [env: FUNC_NAME=]
      --r-id <R_ID>                    Id of the revision to use [env: FUNC_REVISION_ID=] [aliases: --id, --revision-id]
      --revision-name <REVISION_NAME>  Name of the revision to use [env: FUNC_REVISION_NAME=] [aliases: --name]
  -h, --help                           Print help
  -V, --version                        Print version
      --no-interactive                 Skip interactive confirmation [env: FUNC_NO_INTERACTIVE=]
      --no-progress                    Hide all progress bars [env: FUNC_NO_PROGRESS=]
  -o, --output <OUTPUT>                [env: FUNC_OUTPUT=] [default: table] [possible values: json, yaml, table, silent]
  -v, --verbose                        Verbose output [env: FUNC_VERBOSE=]
Describe a function revision
Usage: sfn functions revision describe [OPTIONS]

Options:
  -p, --path <PATH>                    Path to the function workspace. Default is current directory ($FUNC_PATH) [env: FUNC_PATH=]
      --p-id <P_ID>                    Id of the project to use [env: FUNC_PROJECT_ID=] [aliases: --project-id]
      --project-name <PROJECT_NAME>    Name of the project to use [env: FUNC_PROJECT_NAME=]
      --f-id <F_ID>                    Id of the function to use [env: FUNC_ID=] [aliases: --function-id]
      --function-name <FUNCTION_NAME>  Name of the function to use [env: FUNC_NAME=]
      --r-id <R_ID>                    Id of the revision to use [env: FUNC_REVISION_ID=] [aliases: --id, --revision-id]
      --revision-name <REVISION_NAME>  Name of the revision to use [env: FUNC_REVISION_NAME=] [aliases: --name]
  -h, --help                           Print help
  -V, --version                        Print version
      --no-interactive                 Skip interactive confirmation [env: FUNC_NO_INTERACTIVE=]
      --no-progress                    Hide all progress bars [env: FUNC_NO_PROGRESS=]
  -o, --output <OUTPUT>                [env: FUNC_OUTPUT=] [default: table] [possible values: json, yaml, table, silent]
  -v, --verbose                        Verbose output [env: FUNC_VERBOSE=]
List all function revisions
Usage: sfn functions revision list [OPTIONS]

Options:
  -p, --path <PATH>                    Path to the function workspace. Default is current directory ($FUNC_PATH) [env: FUNC_PATH=]
      --p-id <P_ID>                    Id of the project to use [env: FUNC_PROJECT_ID=] [aliases: --project-id]
      --project-name <PROJECT_NAME>    Name of the project to use [env: FUNC_PROJECT_NAME=]
      --f-id <F_ID>                    Id of the function to use [env: FUNC_ID=] [aliases: --function-id]
      --function-name <FUNCTION_NAME>  Name of the function to use [env: FUNC_NAME=]
      --r-id <R_ID>                    Id of the revision to use [env: FUNC_REVISION_ID=] [aliases: --id, --revision-id]
      --revision-name <REVISION_NAME>  Name of the revision to use [env: FUNC_REVISION_NAME=] [aliases: --name]
  -h, --help                           Print help
  -V, --version                        Print version
      --no-interactive                 Skip interactive confirmation [env: FUNC_NO_INTERACTIVE=]
      --no-progress                    Hide all progress bars [env: FUNC_NO_PROGRESS=]
  -o, --output <OUTPUT>                [env: FUNC_OUTPUT=] [default: table] [possible values: json, yaml, table, silent]
  -v, --verbose                        Verbose output [env: FUNC_VERBOSE=]
Update a function revision
Usage: sfn functions revision update [OPTIONS]

Options:
  -p, --path <PATH>                    Path to the function workspace. Default is current directory ($FUNC_PATH) [env: FUNC_PATH=]
      --p-id <P_ID>                    Id of the project to use [env: FUNC_PROJECT_ID=] [aliases: --project-id]
      --project-name <PROJECT_NAME>    Name of the project to use [env: FUNC_PROJECT_NAME=]
      --f-id <F_ID>                    Id of the function to use [env: FUNC_ID=] [aliases: --function-id]
      --function-name <FUNCTION_NAME>  Name of the function to use [env: FUNC_NAME=]
      --r-id <R_ID>                    Id of the revision to use [env: FUNC_REVISION_ID=] [aliases: --id, --revision-id]
      --revision-name <REVISION_NAME>  Name of the revision to use [env: FUNC_REVISION_NAME=] [aliases: --name]
      --rename <RENAME>                New name to set for the revision
      --label <LABEL>                  Revision labels
  -h, --help                           Print help
  -V, --version                        Print version
      --no-interactive                 Skip interactive confirmation [env: FUNC_NO_INTERACTIVE=]
      --no-progress                    Hide all progress bars [env: FUNC_NO_PROGRESS=]
  -o, --output <OUTPUT>                [env: FUNC_OUTPUT=] [default: table] [possible values: json, yaml, table, silent]
  -v, --verbose                        Verbose output [env: FUNC_VERBOSE=]
Manifest
Describe a manifest
Usage: sfn manifest describe [OPTIONS]

Options:
  -p, --path <PATH>      Path to the function workspace. Default is current directory ($FUNC_PATH) [env: FUNC_PATH=]
  -h, --help             Print help
  -V, --version          Print version
      --no-interactive   Skip interactive confirmation [env: FUNC_NO_INTERACTIVE=]
      --no-progress      Hide all progress bars [env: FUNC_NO_PROGRESS=]
  -o, --output <OUTPUT>  [env: FUNC_OUTPUT=] [default: table] [possible values: json, yaml, table, silent]
  -v, --verbose          Verbose output [env: FUNC_VERBOSE=]
Options
List all plans (performance-classes)
Usage: sfn options plans list [OPTIONS]

Options:
  -h, --help             Print help
  -V, --version          Print version
      --no-interactive   Skip interactive confirmation [env: FUNC_NO_INTERACTIVE=]
      --no-progress      Hide all progress bars [env: FUNC_NO_PROGRESS=]
  -o, --output <OUTPUT>  [env: FUNC_OUTPUT=] [default: table] [possible values: json, yaml, table, silent]
  -v, --verbose          Verbose output [env: FUNC_VERBOSE=]
Projects
Get an accessible list of projects
Usage: sfn projects list [OPTIONS]

Options:
      --p-id <P_ID>                  Id of the project to use [env: FUNC_PROJECT_ID=] [aliases: --project-id]
      --project-name <PROJECT_NAME>  Name of the project to use [env: FUNC_PROJECT_NAME=]
  -h, --help                         Print help
  -V, --version                      Print version
      --no-interactive               Skip interactive confirmation [env: FUNC_NO_INTERACTIVE=]
      --no-progress                  Hide all progress bars [env: FUNC_NO_PROGRESS=]
  -o, --output <OUTPUT>              [env: FUNC_OUTPUT=] [default: table] [possible values: json, yaml, table, silent]
  -v, --verbose                      Verbose output [env: FUNC_VERBOSE=]
Registry Pull-Secrets
Create a pull-secret
Usage: sfn pull-secrets create [OPTIONS]

Options:
  -p, --path <PATH>
          Path to the function workspace. Default is current directory ($FUNC_PATH) [env: FUNC_PATH=]
      --p-id <P_ID>
          Id of the project to use [env: FUNC_PROJECT_ID=] [aliases: --project-id]
      --project-name <PROJECT_NAME>
          Name of the project to use [env: FUNC_PROJECT_NAME=]
      --address <ADDRESS>
          The remote registry address
      --label <LABEL>
          The pull secret labels metadata
      --pull-secret-name <PULL_SECRET_NAME>
          A name to identify the pull secrets by
      --no-validate
          Skip registry credentials validation
  -h, --help
          Print help
  -V, --version
          Print version
      --no-interactive
          Skip interactive confirmation [env: FUNC_NO_INTERACTIVE=]
      --no-progress
          Hide all progress bars [env: FUNC_NO_PROGRESS=]
  -o, --output <OUTPUT>
          [env: FUNC_OUTPUT=] [default: table] [possible values: json, yaml, table, silent]
  -v, --verbose
          Verbose output [env: FUNC_VERBOSE=]
Delete a pull-secret
Usage: sfn pull-secrets delete [OPTIONS]

Options:
  -p, --path <PATH>
          Path to the function workspace. Default is current directory ($FUNC_PATH) [env: FUNC_PATH=]
      --p-id <P_ID>
          Id of the project to use [env: FUNC_PROJECT_ID=] [aliases: --project-id]
      --project-name <PROJECT_NAME>
          Name of the project to use [env: FUNC_PROJECT_NAME=]
      --ps-id <PS_ID>
          Id of the pll secret to use [env: FUNC_PULL_SECRET_ID=] [aliases: --id, --pull-secret-id]
      --pull-secret-name <PULL_SECRET_NAME>
          Name of the pull secret to use [env: FUNC_PULL_SECRET_NAME=] [aliases: --name]
  -h, --help
          Print help
  -V, --version
          Print version
      --no-interactive
          Skip interactive confirmation [env: FUNC_NO_INTERACTIVE=]
      --no-progress
          Hide all progress bars [env: FUNC_NO_PROGRESS=]
  -o, --output <OUTPUT>
          [env: FUNC_OUTPUT=] [default: table] [possible values: json, yaml, table, silent]
  -v, --verbose
          Verbose output [env: FUNC_VERBOSE=]
Describe a pull-secret
Usage: sfn pull-secrets describe [OPTIONS]

Options:
  -p, --path <PATH>
          Path to the function workspace. Default is current directory ($FUNC_PATH) [env: FUNC_PATH=]
      --p-id <P_ID>
          Id of the project to use [env: FUNC_PROJECT_ID=] [aliases: --project-id]
      --project-name <PROJECT_NAME>
          Name of the project to use [env: FUNC_PROJECT_NAME=]
      --ps-id <PS_ID>
          Id of the pll secret to use [env: FUNC_PULL_SECRET_ID=] [aliases: --id, --pull-secret-id]
      --pull-secret-name <PULL_SECRET_NAME>
          Name of the pull secret to use [env: FUNC_PULL_SECRET_NAME=] [aliases: --name]
  -h, --help
          Print help
  -V, --version
          Print version
      --no-interactive
          Skip interactive confirmation [env: FUNC_NO_INTERACTIVE=]
      --no-progress
          Hide all progress bars [env: FUNC_NO_PROGRESS=]
  -o, --output <OUTPUT>
          [env: FUNC_OUTPUT=] [default: table] [possible values: json, yaml, table, silent]
  -v, --verbose
List all project pull-secrets
Usage: sfn pull-secrets list [OPTIONS]

Options:
  -p, --path <PATH>
          Path to the function workspace. Default is current directory ($FUNC_PATH) [env: FUNC_PATH=]
      --p-id <P_ID>
          Id of the project to use [env: FUNC_PROJECT_ID=] [aliases: --project-id]
      --project-name <PROJECT_NAME>
          Name of the project to use [env: FUNC_PROJECT_NAME=]
      --ps-id <PS_ID>
          Id of the pll secret to use [env: FUNC_PULL_SECRET_ID=] [aliases: --id, --pull-secret-id]
      --pull-secret-name <PULL_SECRET_NAME>
          Name of the pull secret to use [env: FUNC_PULL_SECRET_NAME=] [aliases: --name]
  -h, --help
          Print help
  -V, --version
          Print version
      --no-interactive
          Skip interactive confirmation [env: FUNC_NO_INTERACTIVE=]
      --no-progress
          Hide all progress bars [env: FUNC_NO_PROGRESS=]
  -o, --output <OUTPUT>
          [env: FUNC_OUTPUT=] [default: table] [possible values: json, yaml, table, silent]
  -v, --verbose
          Verbose output [env: FUNC_VERBOSE=]
Update a pull-secret
Usage: sfn pull-secrets update [OPTIONS]

Options:
  -p, --path <PATH>
          Path to the function workspace. Default is current directory ($FUNC_PATH) [env: FUNC_PATH=]
      --p-id <P_ID>
          Id of the project to use [env: FUNC_PROJECT_ID=] [aliases: --project-id]
      --project-name <PROJECT_NAME>
          Name of the project to use [env: FUNC_PROJECT_NAME=]
      --ps-id <PS_ID>
          Id of the pll secret to use [env: FUNC_PULL_SECRET_ID=] [aliases: --id, --pull-secret-id]
      --pull-secret-name <PULL_SECRET_NAME>
          Name of the pull secret to use [env: FUNC_PULL_SECRET_NAME=] [aliases: --name]
      --rename <RENAME>
          New name to set for the pull secret
      --label <LABEL>
          The pull secret labels metadata
      --address <ADDRESS>
          The remote registry address
      --no-validate
          Skip registry credentials validation
  -h, --help
          Print help
  -V, --version
          Print version
      --no-interactive
          Skip interactive confirmation [env: FUNC_NO_INTERACTIVE=]
      --no-progress
          Hide all progress bars [env: FUNC_NO_PROGRESS=]
  -o, --output <OUTPUT>
          [env: FUNC_OUTPUT=] [default: table] [possible values: json, yaml, table, silent]
  -v, --verbose
          Verbose output [env: FUNC_VERBOSE=]
Templates
Install a template
Usage: sfn templates install [OPTIONS]

Options:
      --source <SOURCE>              The git url of the template repository [default: https://github.com/stackitcloud/sfn-templates.git]
      --install-name <INSTALL_NAME>  The local name for this template (e.g., my-template). If not provided, a name will be inferred from the source
  -h, --help                         Print help
  -V, --version                      Print version
      --no-interactive               Skip interactive confirmation [env: FUNC_NO_INTERACTIVE=]
      --no-progress                  Hide all progress bars [env: FUNC_NO_PROGRESS=]
  -o, --output <OUTPUT>              [env: FUNC_OUTPUT=] [default: table] [possible values: json, yaml, table, silent]
  -v, --verbose                      Verbose output [env: FUNC_VERBOSE=]
Uninstall a template
Usage: sfn templates uninstall [OPTIONS] --template-name <TEMPLATE_NAME>

Options:
      --template-name <TEMPLATE_NAME>  The name of the repository to remove
  -h, --help                           Print help
  -V, --version                        Print version
      --no-interactive                 Skip interactive confirmation [env: FUNC_NO_INTERACTIVE=]
      --no-progress                    Hide all progress bars [env: FUNC_NO_PROGRESS=]
  -o, --output <OUTPUT>                [env: FUNC_OUTPUT=] [default: table] [possible values: json, yaml, table, silent]
  -v, --verbose                        Verbose output [env: FUNC_VERBOSE=]
Describe a template
Usage: sfn templates describe [OPTIONS] --template-name <TEMPLATE_NAME>

Options:
      --template-name <TEMPLATE_NAME>  The name of the repository to describe
  -h, --help                           Print help
  -V, --version                        Print version
      --no-interactive                 Skip interactive confirmation [env: FUNC_NO_INTERACTIVE=]
      --no-progress                    Hide all progress bars [env: FUNC_NO_PROGRESS=]
  -o, --output <OUTPUT>                [env: FUNC_OUTPUT=] [default: table] [possible values: json, yaml, table, silent]
  -v, --verbose                        Verbose output [env: FUNC_VERBOSE=]
List all templates
Usage: sfn templates list [OPTIONS]

Options:
  -r, --runtime <RUNTIME>  Filter templates by function language runtime [env: FUNC_RUNTIME=]
  -t, --trigger <TRIGGER>  Filter templates by function trigger ("http" or "cloudevent") [env: FUNC_TRIGGER=]
      --source <SOURCE>    Filter templates by repository installed name (e.g., 'sfn-templates') [env: FUNC_SOURCE=]
  -h, --help               Print help
  -V, --version            Print version
      --no-interactive     Skip interactive confirmation [env: FUNC_NO_INTERACTIVE=]
      --no-progress        Hide all progress bars [env: FUNC_NO_PROGRESS=]
  -o, --output <OUTPUT>    [env: FUNC_OUTPUT=] [default: table] [possible values: json, yaml, table, silent]
  -v, --verbose            Verbose output [env: FUNC_VERBOSE=]
Update a template
Usage: sfn templates update [OPTIONS]

Options:
      --template-name <TEMPLATE_NAME>  The name of the repository to update. If not provided and --all is true, all repositories will be updated
      --all                            Update all templates
  -h, --help                           Print help
  -V, --version                        Print version
      --no-interactive                 Skip interactive confirmation [env: FUNC_NO_INTERACTIVE=]
      --no-progress                    Hide all progress bars [env: FUNC_NO_PROGRESS=]
  -o, --output <OUTPUT>                [env: FUNC_OUTPUT=] [default: table] [possible values: json, yaml, table, silent]
  -v, --verbose                        Verbose output [env: FUNC_VERBOSE=]
The function manifest - stackit-functions.yaml
In older versions of the CLI we had a single manifest file, the stackit-functions.yaml.
In the meantime, starting from v1.5.0, we introduced a new manifest structure. The manifest is automatically rewritten/migrated into multiple files in the .stackit-functions subfolder of your workspace.
So instad of having a single configuration file you have now more granular resource based configuration files:
Function.yaml
The function.yaml file in the .stackit-functions subfolder in your workspace is the central manifest file for managing your function definition
In this YAML configuration file you can define the name of your function and the trigger.
At the point of time only http trigger is supported.
Why a Manifest File?
- Automation: Facilitates automated deployment, scaling, and management by the STACKIT Functions platform.
- Portability: Allows function configurations to be defined once and applied consistently across various environments.
- Version Control: Enables tracking of function configuration changes alongside your code.
- Clear Definition: Provides a single source of truth for your function’s operational characteristics and dependencies.
The manifests files follow the Kubernetes Resource Definition scheme.
A valid function.yaml manifest could look like:
apiVersion: functions.stackit.cloud/v1alpha
kind: Function
metadata:
  id: 4007c2e5-73b6-11f1-88ab-964e7356151b
  name: my_test_function
  created: 2026-05-06T11:48:27Z
  annotations:
    cli.functions.stackit.cloud/trigger: http
spec: {}
As it can be seen in the snippet above, the function has an id field, which is inserted into the file upon function deploymnt. This identifier can be used as an addition to the unique function name to identify functions running on STACKIT Functions.
Function
A function consists of the function metadata object and the function specification object.
Function Metadata
id: The identifier of the function. Auto inserted into the function manifest once it has been successfully deployedname: The unique identifier for your function. This name is used across the platform for deployment, logging, and management.created: A timestamp, typically in RFC3339 format, indicating when the function’s configuration was initially created or defined.labels: A set of arbitrary key-value pairs used for organizing, categorizing, and applying policies to your functions. Labels enable advanced filtering, monitoring, and operational management.annotations: A set of custom annotations:cli.functions.stackit.cloud/trigger: The function trigger. Currently onlyhttpis supported
Revision.yaml
Besides the function.yaml there also exists a revision.yaml file in the same subfolder .stackit-functions in your workspace.
A revision belongs logically to a function and can not exist on its very own. So it is always bound to a specific function.
In theory you could reuse the revision in a different function workspace as long as the id parameter is not used.
A valid revision.yaml could look like:
apiVersion: functions.stackit.cloud/v1alpha
kind: Revision
metadata:
  created: 2026-05-06T11:48:27Z
  annotations:
    cli.functions.stackit.cloud/runtime: rust
spec:
  image: animage
  envs:
    MYVAR:
      file: .env
      env: MY_VAR
  limits:
    plan: f3
    concurrency: 0
The runtime parameter in the annotations section describes the programming language used in the function, what is especially important for building the OCI image. The value is passed to down the Cloud Native Buildpacks (CNB) and then picked up by the whole build process. Changing the value in a bootstrapped function is not supported.
In the spec part of the manifest file there is an image attribute which defines the name of the image. It needs to be in format <your OCI registry>/<repository>/<image name>:<tag>. The tag can be latest but must then be combined with a digest. Otherwise the API will reject the image and the function revision will not be deployed.
In the env section environment variables cna be configured in different ways. Check the Configuring Variables and Secrets section to learn more about how to configure variables in all supported ways.
The limits define a deployment performance class supported by STACKIT functions.
A list of so supported so called plans can be received by excuting sfn options plans list.
Each performance class mainly differs from others by the usable amount of memory.
The actual function concurrency heavily depends on the programming language used. Rust is much faster than Java and hence is more scalable.
Revision
The revision object contains metadata and spec attributes.
Revision metadata attributes
id: The revision identifier of this specific revision. Will be automatically inserted into the manifest once the revision has been successfully deployedcreated: The creation time of the revisionlabels: Key-Value (string-string) pairs (up to 64)annotations: An object holding revision information:cli.functions.stackit.cloud/runtime: The programming language used in the revisioncli.functions.stackit.cloud/builder-image: A (custom) builder image used to build the function imagecli.functions.stackit.cloud/local-memory-limit-mb: The memory limit in MB for local development/testingcli.functions.stackit.cloud/build-env/*: The build environment declarations. e.g.cli.functions.stackit.cloud/build-env/my-build: '1'- Name of the build env variable can be chosen freely, value must be a string
It is important to mention that the annotations always refer to local behavior only.
Revision spec
image: The OCI image reference containing the function codeenvs: Function Environment variables. For more information check out Configuring Variables and Secretslimits: Revision limits defining plan and concurrencyplan: The performance class for the functionconcurrency: The function concurrency setting
Generated code
When using the provided templates, the STACKIT Functions builder supplies an entrypoint for your function that takes care of starting an HTTP server and handling health and readiness checks.
This way you can focus on writing only the parts of your function that matter.
Generated code - Go
When using the Go template, place your code in a package called “function”, and exposes a Handler function with the same signature as that expected by ServeMux.HandleFunc:
package function

func Handle(w http.ResponseWriter, r *http.Request) {
    // ... Your code goes here
}
Generated code - NodeJS
When using the JavaScript template, place your code in a nodejs package, named "fn", with it’s "main" file exposing either a handler configuation, or a function called new which returns the same.
{ // in package.json
    // ..
    "name": "fn",
    "main": "handler.js"
}
// handler.js

// Option 1: implement the FnInstance interface directly:
module.exports = {
    async handle(context, data) {
        // ... Your code goes here
    }
}
// Option 2: export a new function which returns a FnInstance:
module.exports.new = function() {
    return {
        async handle(context, data) {
            // ... Your code goes here
        }
    }
}
The handler is expected to fit the following interface:
type FnInstance = {
    init?: () => void | Promise<void>;
    shutdown?: () => void | Promise<void>;
    handle: (context: Context, data: string | object) => Promise<Response>,
};
type Context = {
    req: http.IncomingMessage;
    res: http.ServerResponse;

    method: string;
    path: string;
    url: string;
    headers: Record<string, unknown>;
    query: Record<string, string>;
    httpVersionMajor: number;
    httpVersionMinor: number;
    rawBody: Buffer;
    body: string | object;
    log?: { info: (...a: any[]) => void; error: (...a: any[]) => void };
    cloudevent?: CloudEvent;
    cloudEventResponse(data): CloudEventBuilder;
};
type Response =
    void |
    {statusCode?: number, headers?: Record<string, unknown>, body: Body} |
    Body;
type Body =  CloudEvent | Buffer | object;
Generated code - Python
When using the Python template, place your code in a file called handler.py, which has a function called new() that returns a handler object.
The handle function of the handler is an ASGI application.
def new():
    return Function()

class Function:
    async def start(self):
        return
    async def stop(self):
        return
    def handler(self, scope, receive, send):
        # ... Your code goes here, as an ASGI handler
        pass
Generated code - Rust
When using the Rust template, create a Rust library package with the following structure:
#![allow(unused)]
fn main() {
pub mod handler {
    pub const index: impl actix_web::Handler;
    // e.g.: pub async fn index(actix_web::HttpRequest) -> actix_web::HttpResponse;
}
pub mod config {
    pub fn configure(cfg: &mut actix_web::web::ServiceConfig);
}
}
You can define the config::configure function to change how the actix_web HTTP server is configured, and define any handler::index function signature that matches the actix_web::Handler trait to handle the incoming HTTP requests.
Generated code - Java Quarkus
The Quarkus template expects a codebase which uses the Quarkus Fungy framework.
Generated code - Java Spring Boot
The Spring Boot template expects a codebase with a main method, which follows the Functions container interface.
Note that we use Spring Boot Native in order to minimize the memory usage of your Spring Boot-based function.
Tooling
Troubleshooting / Known issues
Help! My function isn’t working! All I get is a 404/blank page!
In the very first alpha release of STACKIT Functions, we don’t have support for checking the status of a function or reading logs in the STACKIT Functions CLI / runtime.
Here is a checklist of things that are easy to get wrong, while we are still working on providing better error feedback from the CLI itself.
- Try running the function locally, using
sfn function buildfollowed bysfn function run. If the function runs into errors while starting up, the STACKIT runtime would never be able to forward requests to it. - Make sure you supply valid registry pull credentials. Otherwise, the STACKIT Functions won’t be able to pull your image. You can get the ID of a registry from
sfn config registries list. See also, Registry access.
If you still don’t know why your function is failing to start, please get in touch!
Deploying a function results in a 502 Bad Gateway error
This means that the STACKIT Functions runtime was unable to read your OCI image’s metadata from the OCI Registry.
Ensure you have registered the registry pull-secret of your images registry Registry credentials. Otherwise, the runtime won’t be able to access the image.
I get a dependency-related error when building an image
Please report the issue to us–it’s possible that we have missed an issue in the template / build process that needs ironing out for your usecase.
Consider building your images with Dockerfile if the supplied buildpacks fail to work for you.